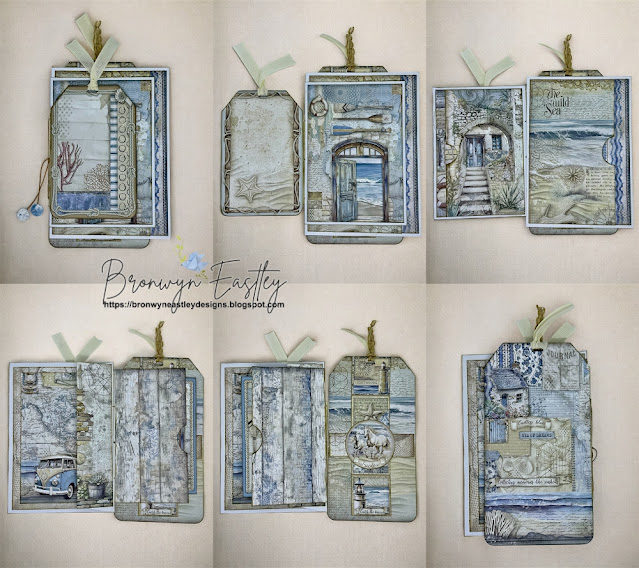
Tags & Envelopes Folios for Funky Folds Blog Hop
Hi and welcome to the July 2025 Funky Folds Blog Hop.
The Funky Folds group consists of like minded paper crafters who love to make projects with fun folds. Funky actually means "modern and stylish in an unconventional or striking way"... so we are featuring cards that are not your usual rectangle/square portrait or landscape style. Think 'easel', 'pop-up', 'gatefold', 'z-fold', 'shaped' or 3D cards etc. The list is endless ... and it now includes journals, albums etc.
All Blog Hops have an 'anything goes' theme using any type of 'funky' fold and today I'm sharing a couple of Tags & Envelopes Folios. I learned how to make this type of folio at a recent craft class taken by LJ's Crafty Corner.
If you love to make cards, journals, albums etc. with creative folds and would like to participate in our monthly Funky Folds Blog Hop, you are welcome to join up through our community group on Facebook - facebook.com/groups/funkyfoldsbloghops
Stamperia - Silent Sea
This folio design consists of a small tag for the front cover, a larger tag for the back cover and two different sized envelopes for the middle pages, joined together with an inside hinge and sewn together with a signature stitch using wax thread.This is the one that I made in class featuring the gorgeous 8x8 and 12x12 papers from Stamperia's Silent Sea. I love how Lynne has designed this folio with lots of pockets and a belly band inside the back cover. I've started making another one with the Silent Sea Backgrounds Papers and Cards Collection which I'll share with you another day.
Of course I had to make one with products from Paper Rose Studio while the design process was still fresh in my head and seeing that my craft desk was covered with papers and embossed die-cuts left over from my latest Design Team Project (which will be released tomorrow), I decided to use the very cute products from the Strawberry Friends Collection for my second Tags & Envelopes Folio.
Paper Rose Studio - Strawberry Friends
I needed to be a little bit more creative with the design of this one as I was working with 6x6 papers and some measurements called for longer lengths.
So I used some cardstock to create a base for the back tag and larger envelope flap. It seemed to come together quite well and in the process I managed to finish off the entire pack of 6x6 paper!
The cute critters and other images in the pack of embossed die-cuts are so adorable. Make sure you come back tomorrow to check out the set of cards that I made with this collection!
In the meantime, click on the links below to view all the amazing Funky Folds in our July Blog Hop -
Blog Hop Participants
Thanks for hopping by,


What beautiful papers!! Great projects!!
ReplyDeleteThanks so much, Tammy. This design is a little addictive.
DeleteBeautiful projects, love the supplies as well
ReplyDeleteThis comment has been removed by the author.
DeleteThanks Cindy. I've used supplies from two of my favourite companies - Stamperia and Paper Rose Studio.
Delete